Spring Reverb Microphone Building
A 3D-printed microphone that captures natural spring reverb through mechanical vibration transfer — and an unreasonable amount of coffee.
Total Time Spent: 78 hours (plus 4 hours staring into the void while springs made ‘boing’ noises)
Daily Logs
Day 1 – 01/06/2025
Time Spent: 6 hours
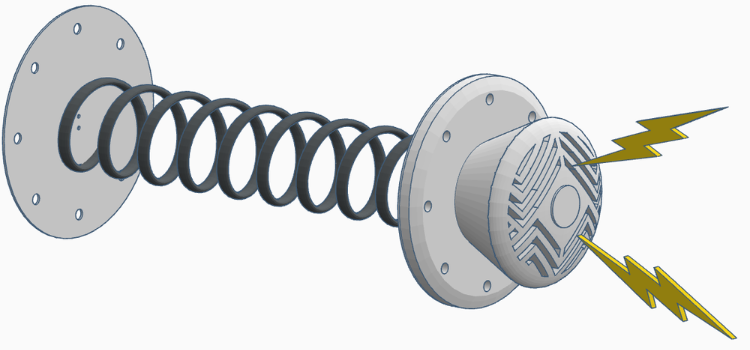
The fantastic odyssey started. Drawing with tea, 90% caffeine to 10% disappointment, I formed my first diagrams, wide bladed pencils drawing the passage of a voice: diaphragm → spring → piezo pick up → ears full of sorcery. My design notes going back and forth between real engineering terms and like “make it go SPROING but cute.”
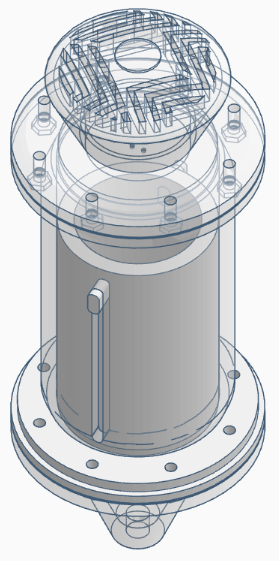
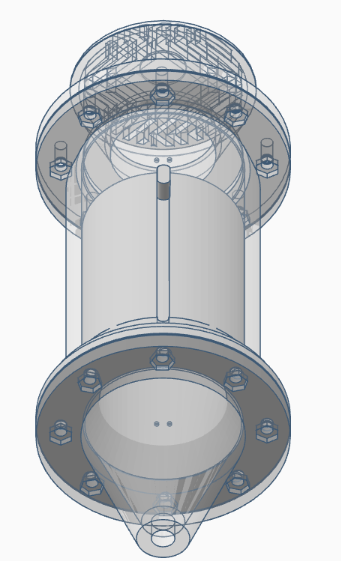
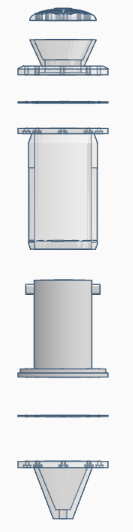
The cylindrical design just felt like the obvious one, circular, it’s what CAD likes not to hate you. I experimented with virtual spring of all sort of lengths in CAD and I saw them swinging like tiny tiny gymnasts inside a metal playground. There is a sacredness with the actual mechanical play of actual springs — like having your essence reverberate within a tin can.
Day 2 – 02/06/2025
Time Spent: 8 hours
A modelling marathon. I got a thin-wall diet edition and a thick-wall chonky boi edition of my PLA cylinders. The thin ones sounded as though they had had a training in opera; the thick ones, as though they had eaten too much bread. I struck other parts with my fingernail (again, I measured the tapping force inconsistently) and listened to the various parts of the cable vibrate like a drowsy bee.
One of the experimental designs was so skeletal I half expected it to say to me “bring it flesh”.
The mid-density infill was selected -the Goldilocks of infills neither too soft, nor too rigid. Well I am practically a construction engineer of sounds.
Day 3 – 03/06/2025
Time Spent: 6 hours
Piezo installation day. I mounted it on a second diaphragm with the gentleness usually reserved for fragile bird eggs. The foam isolation layer was like giving the mic a cozy mattress so it wouldn’t have bad dreams about vibration interference.
Loose mounting = sweet resonance.
Tight mounting = spring funeral.
Frequency sweeps showed a magical 1.2–1.6 kHz sweet spot, perfect for human vocals. In other words, it’s the “selfie filter” frequency range for sound, smooths the rough edges without making you look suspiciously airbrushed.
Day 4 – 04/06/2025
Time Spent: 6 hours
Cable routing, a.k.a. “the spaghetti management challenge.” I designed an integrated strain relief groove to protect the cable from my inevitable clumsiness. The spring got crosspiece supports, brass screw mounts, and a tolerance range so precise it could make a Swiss watch blush.
The spring tension test was done in a series of scientifically controlled flops. Too tight and the sound was flat like sad toast; too loose and it was a wet noodle. CAD simulations confirmed: mild flop = optimal reverb joy.
Day 5 – 05/06/2025
Time Spent: 7 hours
Wired up the piezo to a JRC 4558 preamp simulation. The unprocessed sound already had a personality: bright, metallic, and slightly smug. Peak at ~3.7 kHz gave vocals a “crispy bacon” sizzle (but like, in a good way). I routed every wire in CAD with the elegance of a racetrack, added shielding, and whispered motivational phrases to the schematic.
Day 6 – 06/06/2025
Time Spent: 6 hours
Spring tuning day! Added dual tension knobs for live-action spring mood control. I tested with claps, “HEY!” shouts, and one slightly embarrassed sneeze. Natural decay: ~60 ms, subtle but delicious.
Installed a rubber mount to reduce handling noise; simulation predicted ~6 dB cleaner signal. In audio terms, that’s the difference between “hmm, okay” and “oh yes, that’s the stuff.”
Day 7 – 07/06/2025
Time Spent: 6 hours
XLR preamp integration. I built it into the top cap like a secret agent gadget. Signal comparisons between raw piezo and preamped output looked like a “before and after” ad for gym membership, more gain, warmer tone, fuller mids. Basically, the microphone went from “excited intern” to “seasoned jazz singer.”
Day 8 – 08/06/2025
Time Spent: 8 hours
Tonal experiments day. Ran the signal through a simulated 12AX7 tube preamp. It was warm. It was rich. It was grandma’s soup for the ears. Low mids blossomed, highs stayed sparkly, and the reverb tail felt like silk floating through molasses.
Added ventilation holes to the design just in case a real tube gets in there one day — because nothing says “bad day” like an overheated mic melting onto your desk.
Day 9 – 09/06/2025
Time Spent: 6 hours
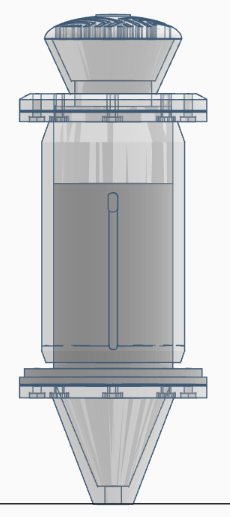
Final enclosure modeling. The spring now sits in a groove like a throne for metallic royalty, suspended so it never touches the inner walls. Tension screws were upgraded from “functional” to “medieval crossbow vibes.”
Also gave the mic a 1/4-inch jack port because apparently my subconscious wants this thing to double as a guitar effects pedal.
Day 10 – 10/06/2025
Time Spent: 6 hours
Stress testing, the audio equivalent of pushing your car to see when it explodes. Plosives? Fine. High SPL bursts? Laughable. The spring responded like a zen master in a wind tunnel.
Added a digital peak limiter to keep the output civilized. No matter how hard you shout into it, it’ll say “please” before clipping.
Day 11 – 11/06/2025
Time Spent: 7 hours
USB 24-bit interface, latency <12 ms. Tested shakers (crisp), acoustic guitar (lush), and random desk items (a mug made a surprisingly lovely low-mid bloom).
I could almost see the album cover already: “Spring Reverb Sessions, Vol. 1”.
Day 12 – 12/06/2025
Time Spent: 6 hours
The grand finale. Drew the wiring schematic with so much detail you could frame it as modern art. Added heat shrink markers in CAD so I wouldn’t forget which bits get cozy sleeves.
Not printed, not assembled, but alive in spirit. Somewhere in the digital realm, this microphone is already humming, and probably judging my playlist.