
FlyQ
An Ultralight fixed wing autonomous UAV. Note: Not all parts listed from June 1st-6th are used.
June 1st
Project inception, I researched on the different types of drones and decided what I want to build. Here is all of the research condensed down for reader's consumption. Project goals: - ultralight - should have autonomous flying capabilities with failsafe RTH - medium range (4-8 km) - cameras - fixed wing - durable
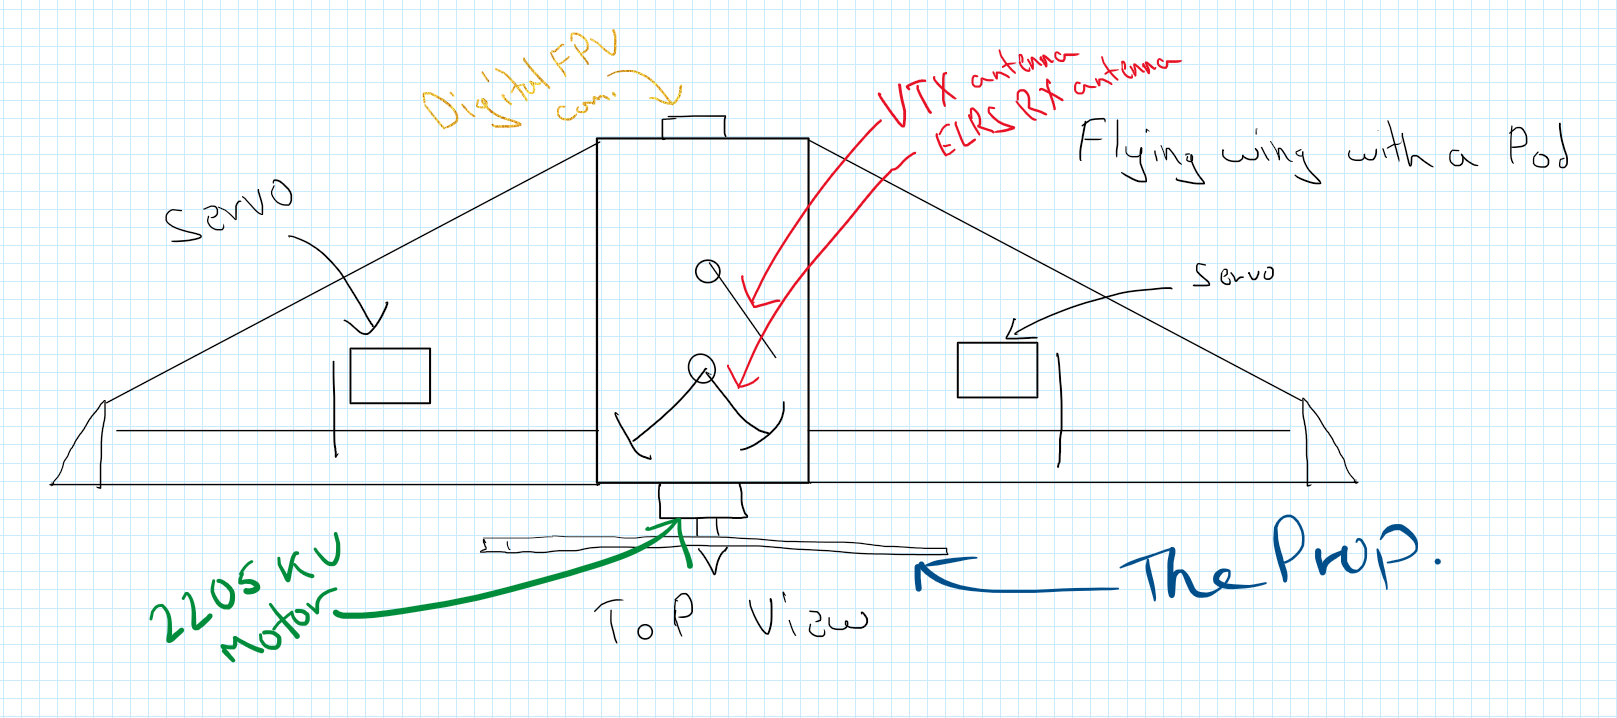
Considering all goals, I have decided: It is going to be a flying wing design with single rotor at the back (pusher).
Time spent: ~3-4 hrs (research)
June 2nd
Agenda: Airframe I am researching on the airframe, how it's going to be made, design desisions, extra provisions etc. I have decided it is best to buy a commercial frame for it being made out of molded EPP foam goes a long way towards crash resistance (EPP foam compresses and does not break (shatter) like defron sheets if I were to DIY it). There are a few downsides to this, notablily this kinda makes future customization on the drone itself a bit difficult but I think that is acctable considering the other factors. Time spent: ~2-3 hrs I had some more time today so I have decided to look into which commercial frame that is readyly available here that can be bought. I am going for a single prop design as it is cheaper due to only one motor being persent and the cruise current being lower for the same reason. I've chosen the 'Reptile S800 V2 Flying Wing'
I chose this due to it's avaibility in an Indian store and alignment with the project goals. It's made with EPP ensuring the drone dosen't break on impact. Time spent: ~3 hrs
June 3rd
Agenda: Flight Control systems
I'll try to decide which control systems to put on drone as per my budget and other factors like compatibility with Ardupilot/INAV (autonomy), ELRS etc.
I've decided to go with the SpeedyBee F405 WING MINI Fixed Wing Flight Controller

 It is very light at 23g and supports INAV and Ardupilot. It is well within budget at US$35.99 (around $47 USD in Indian sites)
I've checked out some 40 FCs but this seems to be the best in it's capabilities and price based on the STM32F405. It has integrated IMU, barometer and OSD.
It is very light at 23g and supports INAV and Ardupilot. It is well within budget at US$35.99 (around $47 USD in Indian sites)
I've checked out some 40 FCs but this seems to be the best in it's capabilities and price based on the STM32F405. It has integrated IMU, barometer and OSD.
I've read the INAV and Ardupilot docs to compare which one would be simpler for my use case. As I see, Ardupilot is a much more sophisticated solution for drone piloting, while INAV is simpler, and fits my usecase better, which is autonomy for some time, not very long range ops.
In my search for a good FC, I initially came across Matek F405-Wing, which is a nice FC and what I was going to use until I continued searching and found the SpeedyBee F405 Wing Mini, which is much lighter than the Matek version. I also came across the Matek F722-Wing, it is also a nice FC, a little too nice, it's too expensive for this lightweight platform. Betaflight FCs (F411s etc) were too slow to support everything and that kinda raised some questions about it's stabilty running everything. This FC was a stack option containing PDBs and current sensors inbuilt. Also has Barometers for altitude measurement. My search for the FC was narrowed down with the help of INAV docs with which I could tell if it had the minimum requirements for my needs, as it needed to run INAV. (ref feature 1 here) Read some more about flying with INAV here https://github.com/iNavFlight/inav/blob/master/docs/INAVFixedWingSetupGuide.pdf and https://github.com/iNavFlight/inav/blob/master/docs/Navigation.md
Also selected the GPS module to be used with this FC, it's a Flywoo GOKU GM10 Mini V3 GPS
 Time spent: ~4 hrs
June 4th
Agenda: Other parts Selecting other parts in accordance with compatibilty with FC, budget and project goals.
Motor
XING 2205 FPV Motor (12/M2) - 2300KV
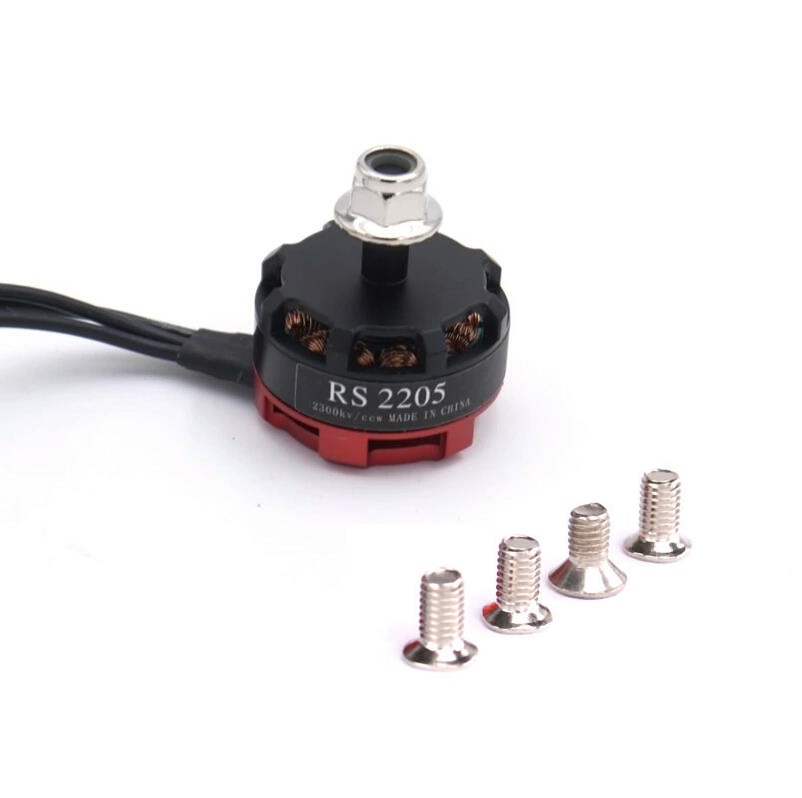 Within budget, efficient rating.
This is a popular FPV motor within FPV circles. At 2300KV, it produces enough thrust to cruise comfortably with just the right amount of energy. It's reliable, lightweight and efficient, ideal for this project.
Within budget, efficient rating.
This is a popular FPV motor within FPV circles. At 2300KV, it produces enough thrust to cruise comfortably with just the right amount of energy. It's reliable, lightweight and efficient, ideal for this project.
ESC
Readytosky 40A 2-6S Multi-Rotor UAV Drone ESC
 Also, within budget and has a sufficient rating.
At 40A, this is more than enough for what the motor will ever experience, with enough headroom for boosts past the normal every once in a while. It is reasonably priced and well-known.
Also, within budget and has a sufficient rating.
At 40A, this is more than enough for what the motor will ever experience, with enough headroom for boosts past the normal every once in a while. It is reasonably priced and well-known.
ELRS RX
 MATEKSYS ELRS 2.4GHz Vario Receiver ELRS-R24-V
This is an important component (although one could say this for all of them). It's an ELRS receiver, which stands for Express Long Range System, is a
MATEKSYS ELRS 2.4GHz Vario Receiver ELRS-R24-V
This is an important component (although one could say this for all of them). It's an ELRS receiver, which stands for Express Long Range System, is a High Performance Open Source Radio Control Link
optimised for long range and low latency. Read a lot in the ELRS docs. It can pull some long-range (50+ km) stuff even on 2.4 GHz.
Camera DVR
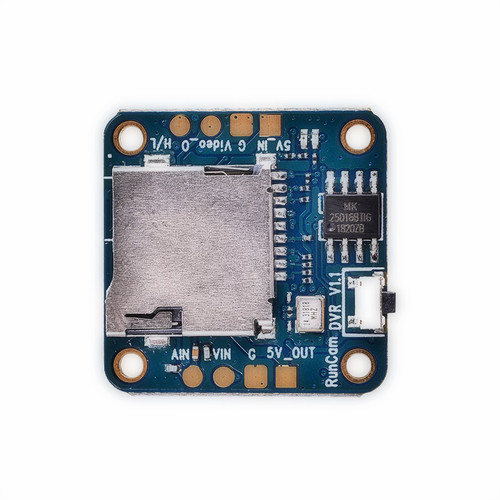 It is a RunCam Mini FPV DVR, fits right in the budget.
It was meh, i didn't quite like it as it can't record in HD but I guess for that price it's the best I can get.
It is a RunCam Mini FPV DVR, fits right in the budget.
It was meh, i didn't quite like it as it can't record in HD but I guess for that price it's the best I can get.
Camera
 It's a Caddx Ant Lite Analog Camera (FPV Cycle Edition) (4:3), cheapest while having great quality.
Its cheap, at this price point it's hard to beat. Great for this build.
This is cool, cheap and probably not the camera for drones so would need to hack it for it to work with the FC and VTx.
It's a Caddx Ant Lite Analog Camera (FPV Cycle Edition) (4:3), cheapest while having great quality.
Its cheap, at this price point it's hard to beat. Great for this build.
This is cool, cheap and probably not the camera for drones so would need to hack it for it to work with the FC and VTx.
Spent a lot of time reading the ELRS and INAV docs. Also got help from the Oscar Liang blog. Spent some time researching batteries.
Time spent: ~6-8 hrs
June 5th
Remaining electronic stuff for the drone.
VTX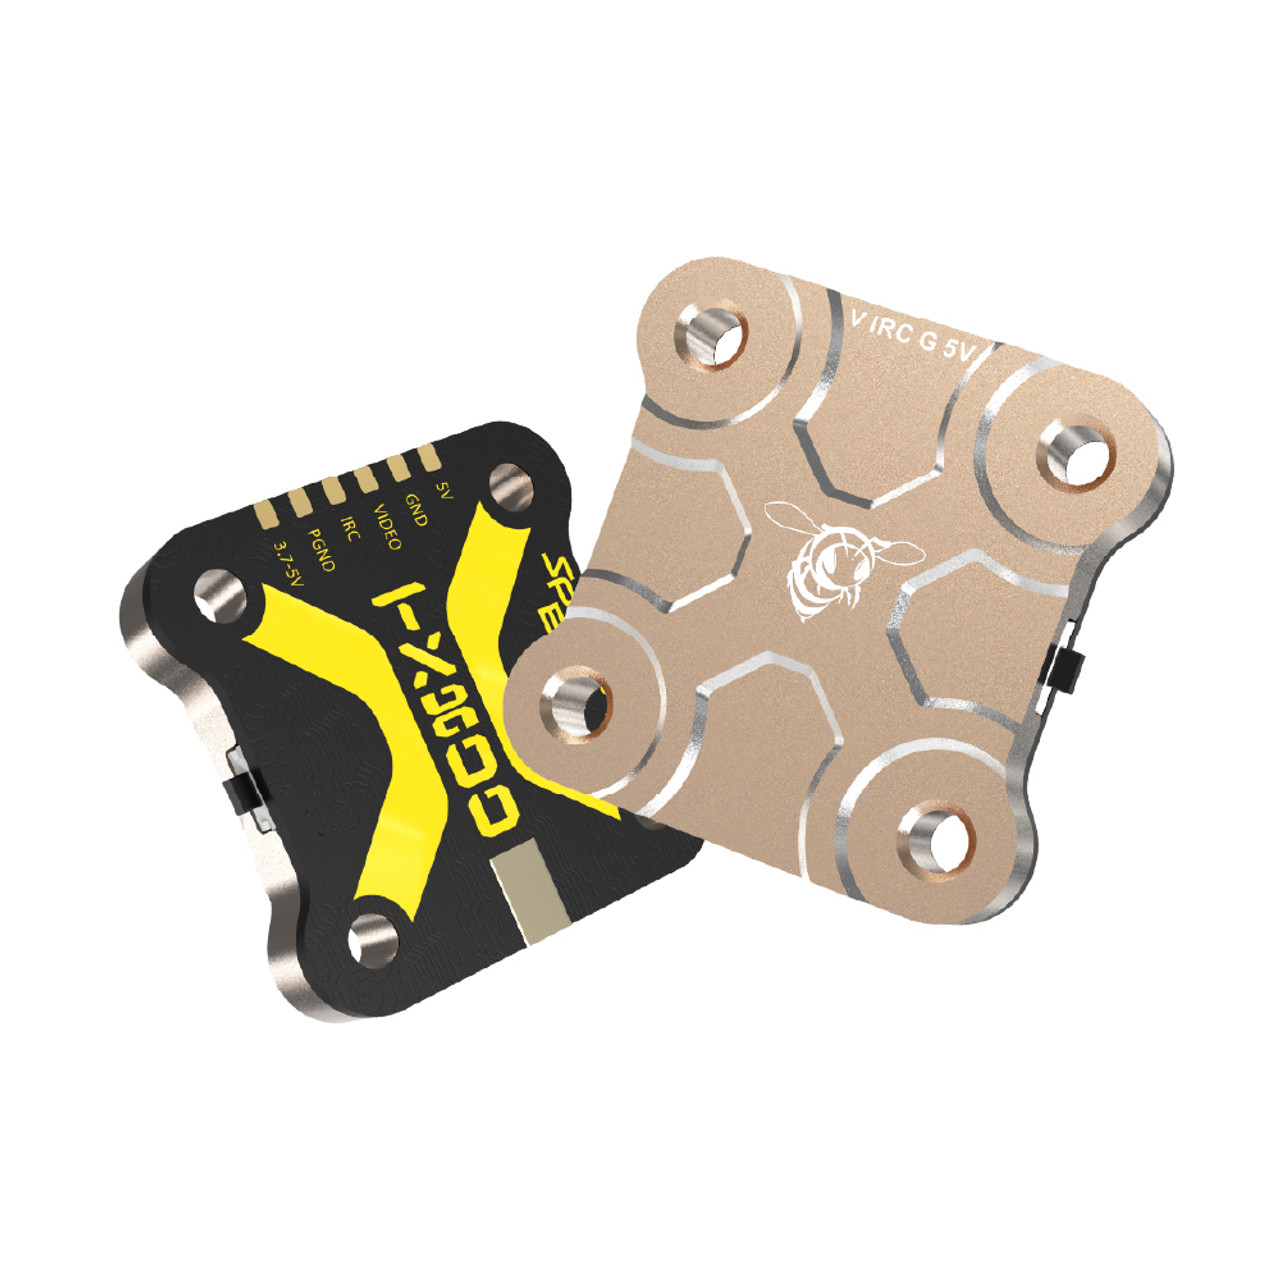
SpeedyBee TX800 5.8 GHz VTX One of the few available VTxs here, it's cheap-er than most and the transmit power is under limits and enough for mid range stuff.
Battery
 Samsung INR18650-35E 7.4V 3500mAh 2C 2S1P Li-ion Battery Pack
Nice value for the battery pack, it's good that it's made by robu and sold by robu.
Samsung INR18650-35E 7.4V 3500mAh 2C 2S1P Li-ion Battery Pack
Nice value for the battery pack, it's good that it's made by robu and sold by robu.
VTX Antenna
Pagoda 2 Antenna 5.8GHz with cover
Good antenna, cheap, would be used for the drone VTx.
Time spent: ~4-5 hrs
June 6th
Ground station stuff
VRX
5.8G UVC OTG Android AV Phone Receiver
Budget check (retail prices at 1USD = 85.76INR)
Airframe - $49.05 FC - $39.77 GPS - $19.80 Motor - $9.32 ESC (!!) - $8.71 ELRS RX - $29.71 DVR - $17.99 Camera - $18.80 VTX - $28 USD Battery - $12.57 Antenna (drone) - $4.19 ### Total till now - $ 246.94 Prices taken from the best retailers found. That took too long. Finding the cheapest non-scammy retailer for niche stuff is a bit hard. More so in India, thankfully, I was able to find retailers for all the parts.
Ah, Houston, we have a problem. That price is too high; it's more than I thought for just this part of the project. I must do something about it. I suppose I'd have to allow myself to import and change parts for better, more cost-effective alternatives.
Did some research on drone parts from YouTube and Oscar Liang's blog. They are a nice resource on builds like these, not just these but most other builds would benifit from the infomative blogs and youtube reviews. Time spent: 4.5 hrs
Break
I took a break. Returned on June 15th
We can do better. Revamping materials and stategry to bring this greatly under budget.
To do so, we're changing the following:
- Allowing imports
- Frame
- FC
- Camera and VTX
I lost of count of time spent on doing this, I have been at it for 2+ days at this point.
But I have selected all the new parts.
I've listed the new parts below, the cateories that aren't listed have kept their initial selection. GPS - HGLRC M100 5883 GPS Module M10 Chip with QMC 5883 Compass Ceramic Antenna - $14.39 Motor - Readytosky 2205 2300KV 3-4S CW CCW Brushless Motor - $8.69 ESC - Generic ESC 30A - $4 ELRS RX - Radiomaster RP3 ExpressLRS ELRS 2.4GHz LNA+PA Dual Antenna Nano Diversity Receiver for Whoops FPV RC Racing Drone Airplane - $21.73 FPV setup, full (VTX, VRX, Camera, Antenna Combo) - Eachine Sphere Link 5.8GHz WIFI Digital HD 800mW - $67.35 Servo - TowerPro SG90 9G Mini - $4
This brings the drone hardware cost below $170 (from ~$250)
Below is the design for the drone airframe, it's going to be built out of XPS foam boards, supported by carbon fiber spars and reinforced with packing tape.

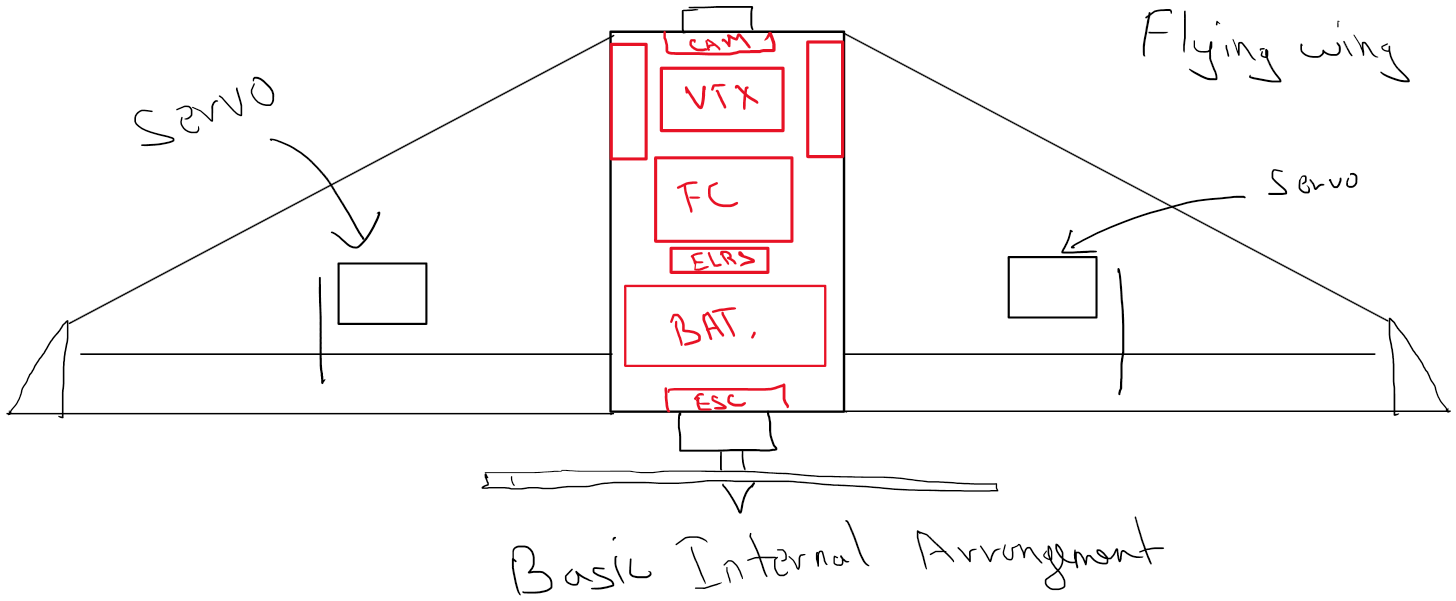
For Accurate wiring, I'd need to have the hardware in hand, so I will not be able to do that until the parts arrive.
For firmware, I'd be using INAV 6.0 for autonomy and Rocketmaster Pocket for ELRS control link, and using it will passthrough telementry data to the ground station.
I am also designing a custom PCB DVR for the drone, it will be used to record the video feed from the camera on the drone onto a SD card onboard for even higher image quality and data recovery.
For FPV setup, I will be using the Eachine Sphere Link 5.8GHz WIFI Digital HD 800mW, which is a combo of VTX, VRX, Camera and Antenna. It is a digital setup and will provide much better image quality than analog setups, at a cost that is cheaper than most.
For the FPV ground viewing, I'd be using a phone initially with plans to bind it with a rpi02w soon.
I have carefully selected all the parts to ensure they are compatible with each other and fit within the budget. I have also taken into account the weight of each component to ensure the drone remains ultralight.
XPS foam boards are great for this project as they are lightweight and help me keep the drone within limits.
This concludes Part 1 of the FlyQ project.
spent ~15 days designing, refining and finalizing the design, parts and budget.
27th June
wait a second, wasn't that the end? apparently not, there's more to come.
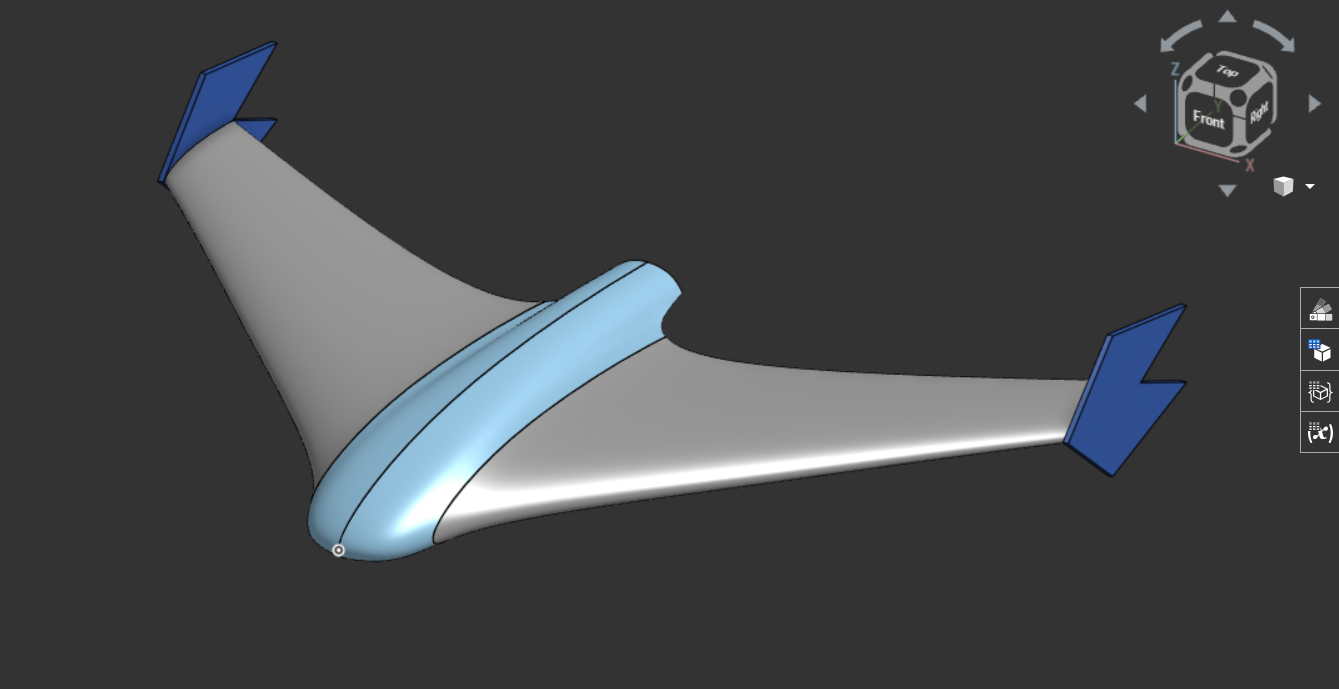
Designed with a meticulous selection of components to achieve a compact, efficient, and high-performance system.
I present you FlyQ, the ultralight fixed-wing autonomous UAV.
 .stl files in root
Summery:
Bit of a rewrite, but this improves the formatting of the initial part (sourcing parts [new ones])
Let us recap the project goals Project goals: - ultralight - should have autonomous flying capabilities with failsafe RTH - medium range (4-8 km) - cameras - fixed wing - durable
| Sr. No. | Image | Name | Category | Sub-Category | Main Use | Considerations while choosing | Cost | Extra remarks |
|---|---|---|---|---|---|---|---|---|
| 1 | https://cdn11.bigcommerce.com/s-fhxxhuiq8q/images/stencil/500x500/products/240/1367/SB_WING-MINI-1__04828.1707096339.jpg?c=2 | SpeedyBee F405 WING MINI Fixed Wing Flight Controller | Electronics | Main control | Flight Controller | Cheap, Very light, Support INAV/Ardupilot, built in barometer, current sensor, OSD and UART capabilities, ecosystem. Entire stack | $39.00 | Will probably buy from Banggoods as while it's $2 cheaper when directly compared, the shipping cost takes ~$15. |
| 2 | https://m.media-amazon.com/images/I/51ASMWWGR7L._UF1000,1000_QL80_.jpg | HGLRC M100 5883 GPS Module M10 Chip with QMC 5883 Compass Ceramic Antenna | Electronics | Main control | GPS | Cheap, Has Compass, Accuracy, Latest M10 chip, Has a compass, Lightweight | $13.00 | |
| 3 | https://m.media-amazon.com/images/I/41W5V3w09pL._UF350,350_QL80_.jpg | Readytosky 2205 2300KV 3-4S CW CCW Brushless Motor | Electronics | Main control | Motor | Well known FPV motor, reletively lightweight | $8.69 | India shop |
| 4 | https://ae01.alicdn.com/kf/Sd7f9c6000a61405a96563ed8aa87b3907.jpg_960x960.jpg | Readytosky 40A 2-4S ESC with 3.5mm Banana Connector | Electronics | Power | ESC | Well known FPV ESC, within limits, reletively lightweight and cheap | $6.14 | would have bought the 30A 2-4S varient for a dollar less if it was in stock; Have to solder connections |
| 5 | https://ueeshop.ly200-cdn.com/u_file/UPAX/UPAX406/2308/23/photo/RP3-V2-Detail-Page-EN-Mobile01-9e6f.jpg | Radiomaster RP3 ExpressLRS ELRS 2.4GHz LNA+PA Dual Antenna Nano Diversity Receiver | Electronics | RF | ELRS RX | Best range vs. Cost, Reletively cheap | $20.00 | Have to solder connections |
| 6 | https://imgaz3.staticbg.com/thumb/large/oaupload/banggood/images/78/EF/4299da5d-869b-45a3-80de-5bc60856469b.jpg.webp | Eachine Sphere Link 5.8GHz WIFI Digital HD | Electronics | Accessory | FPV system | Unbeatable price for a HD FPV system (Camera + VTX + Reciever) | $70.00 | |
| 7 | https://encrypted-tbn0.gstatic.com/images?q=tbn:ANd9GcSmdgw4eVREMJC2hH6P0phcIXBU7NcqDeXbFA&s | Pro-Range Propellers 6042(6X4.2) Tri Blade Flash 2CW+2CCW 2 Pair Pack- Black | Structural | Thrust | Prop. | Cheap, within parameters. Aerodynamic efficiency | $3.00 | |
| 8 | https://encrypted-tbn0.gstatic.com/images?q=tbn:ANd9GcRjw1WUnR5fEDjanitMtx7iaRLjqHcGkv8usQ&s | Samsung INR18650-35E 7.4V 3500mAh 2C 2S1P Li-ion Battery Pack | Electronics | Power | Battery | Cheap, Good Wh vs. Price | $12.00 |
Here's an accounting sheet for the project, it contains all the parts I have ordered in relation to it, by all, I actually mean all, even the itty bitty ones. You can check it out here.